Wednesday, 6 September 2017

New weatherboards and verandah decking

So after we had our balcony replaced and it looked so nice (you can read about it here) I decided we needed to go ahead and do the whole front of the house.  That included the verandah posts and decking - basically everything except new windows as I wanted to keep the double hung sash windows.

The builders did a great job and it actually was surprisingly quick.  Old cladding came off, including the power needing to be disconnected briefly due to the old meter box on the front of the house - this was reconnected back up later on the same day when the new boards were put on.

I had a whole lot of photos of the process but unfortunately it seems when I switched to a new phone they were lost.  So instead I will have to make do with some before and after shots!


This is the finished product with the new verandah, poles, and all painted up.  

This is a during shot of me painting the weatherboards (complete with my upside down lights).


The before shots - dodgy handrail, bright blue paint (although you can't see how bad the paint job actually was!).

This before shot shows some of the rotten and dodgy verandah decking boards.  Plus when I had half stripped one window frame!


More before shots.

Before - but I still have the same pots to hang from the verandah!

We used the same Mirbau decking as the balcony and the same profile weatherboards as the upstairs. We also put on a new Colorbond roof on the verandah - which took the longest due to some stuff ups with the roofers and some fairly big variations in quotes.  In the end we could only really afford to do the small portion of the roof and gutter - so we unfortunately have a current patchwork part red and part grey roof!

After the painters we used for the upstairs part did a not particularly brilliant job and still cost a lot of money I decided that I would give painting a go.  My theory was if I was terrible then we could pay someone and not too much damage would be done.  In the end I was pretty happy with the results.  The weatherboards themselves went fine, although the trims weren't so easy (partly because we kept the old windows and even with multiple attempts at sanding and filling they remained fairly lumpy and difficult to paint). My tips for painting weatherboards can be found in this post.

End result though is very pleasing. The colour scheme is Dulux Miller Mood for the weatherboards, with Vivid White for trims and the dark grey for the decking is Ironstone - a colour that matches up to the Colorbond colour of the same name.


Finished product - deck in Ironstone, weatherboards in Miller Mood and trims in Vivid White.  Plus the same hanging pots and dodgy paint job on my cane chairs!


Saturday, 2 September 2017

A white picket fence

Turns out this is a historic post now - took me a long time to actually post it up!

After having a bit of a break from our renovations I upped the ante again to try to get things going again.

And first up was the fence.

The picket fence (on top of the green painted sandstone monstrosity) was rotting and paint peeling and cracking.  At first I thought that we could just slap another layer of paint on and cover it up.  I had planned to replace a few palings as needed, but thought I could do a bit of patch up job.


I pulled one of the rough palings off and took it to Fedwood, which is just up the road in Rozelle.  I discovered that to have the palings custom made to match the previous ones (which were bevelled edge) would cost $7 a paling. Which seemed kind of expensive, especially when their run of the mill palings are a lot cheaper.


I got a quote to have the fence replaced and it came to about $4000, which again seemed to be expensive!

After discussions with my neighbour I struck upon a much better plan.  Another neighbour (this is a great street!) is a builder and so he was able to put the fence in for us.  We just paid for materials and labour and hey presto, a fence for significantly less!

But then we had to paint it.  (mind you I was going to have to paint it for the $4000 too!)  So I started with a brush, but it looked kind of streaky.  Then I tried a roller, but it seemed very thin.  And my final attempt was with a spray gun.  I had a few false starts, as the paint was very spattered when it came out , but once I diluted it up more, the spray gun was the winner.  It gives a much more consistent coverage.  My poor husband got the job of holding up a drop sheet so that I didn't paint the cars on the street - not the most fun job but it did seem necessary, as we didn't have any other way of holding it up.

I was pretty pleased with myself when one of my neighbours came past and told me how good it looked - and then said "I'll pay you to do mine!"   Don't think I'll be becoming a professional painter any time soon, but I figured it must look not too bad.

So we have a lovely new white picket fence.  Add some silver numbers for the street number and a fairly stock standard letterbox and it's all good.  Mind you after a eighteen months or so (it takes me a long time to put up these blog posts!) it looks like it needs repainting already if you look at it too closely...


This shows the still partly green sandstone fence (and my appalling lack of weeding - the weeds are coming out through the sandstone!.

Sunday, 4 June 2017

Making a study nook (or more commonly known as a desk in an underused space!)

It seems like everywhere you look (if you look at home improvement programs, or decorating magazines) there is something about a "study nook".  So when I came to the conclusion that doing my work spread out all over the dining room table, and keeping work stuff in four different places in the house and carrying the printer up and downstairs to use it wasn't all that practical, I decided I could make a study nook too.  

We actually had the perfect place for it.  After getting our balcony all fixed up off our upstairs bedroom (see the post about that here I now feel much more likely to actually use the space and have the french doors open.  Well, I will when it is warmer anyway.  And in the walkway to the balcony was a reasonably large area of dead space.  


The layout was measured up - 207cm long and 193cm wide - so not exactly huge, but certainly enough.  After all I've seen bedrooms in some innerwest terraces that are not all that much bigger!


So I decided all I needed to do was paint the space up and get some furniture.  And bingo, work space that doesn't take up all of the room in the house.


Of course I always forget that painting isn't that easy!  Especially in this room with our unusually shaped ceiling.  Being an old workers cottage we have an extremely steep pitched roof, and the internal ceiling in our bedroom has the internal sloping walls.  So I had to contend with high and strange shaped ceilings.  Plus the previous owners had unusual taste in colours - at least this part was only a mint green before, and not the very dark grey or green that is on the other walls.


One bonus was that the skirting boards had already been taken off when the builders took the floor up for the balcony building- so I could paint in the knowledge we will be putting new white skirting boards on later.


One undercoat and two coats of colour later, I have finished the painting.  I used the same colour as we used for all the walls downstairs, mainly because I had a few litres left.  Of course, I did run out of it when I was halfway through the second coat which caused a mad rush off to buy more. 


It was quite good as I had a bit of a deadline and impetus to finish - I figured fitting out my home office with furniture would be tax deductible and I wanted to claim it in the 2015-2016 tax year - so all had to be done and ready for furniture before the last weekend in June!   Mind you I have now taken almost a year to finish my post!


I used a small table that we had downstairs as a general rubbish collection table and have put it in the space for a desk.  One nice new office chair, a filing cabinet that doubles as the printer stand and a good desk lamp later and voila, my study nook is ready.  Ok, so it's not exactly going to win any prizes for styling and I'm sure that it would ripped apart as boring on any home improvement show, but I'm really happy with the result, and with the fact that now all my work stuff is stored in one place and I can actually find things!


And on a gloriously sunny winter's day like today (these photos are hot off my phone from today!) it's not too bad a spot to sit and do some work - or some blog posts.

Wednesday, 31 May 2017

Restoring a door

When we moved into our crooked little cottage there was a very small room off the kitchen which was used as a shower room.  This seemed weird to us given the bathroom/laundry was right next door, so we put a shower over the bath and decided to use the shower room as a cupboard.

When the shelves I ordered to fill the new cupboard I realised they would not fit through the doorway with the door in place.  So the door was removed, and has sat on our deck for months and months.

The problem with the door is that it had glass panelling, and one had been broken.  The previous owners fixed this by putting a piece of cardboard over it and once all the panes were painted you couldn't really tell.  But when the cardboard fell out, it was pretty obvious.


The door was heavy and the old fashioned glass was dangerous - no safety glass here.  So I decided to take on a restoration project.   I didn't realise it would take so much effort for such a small door!  Mind you, with the crooked old house I had to restore the door, as it was probably unlikely that I would find a new door to fit.

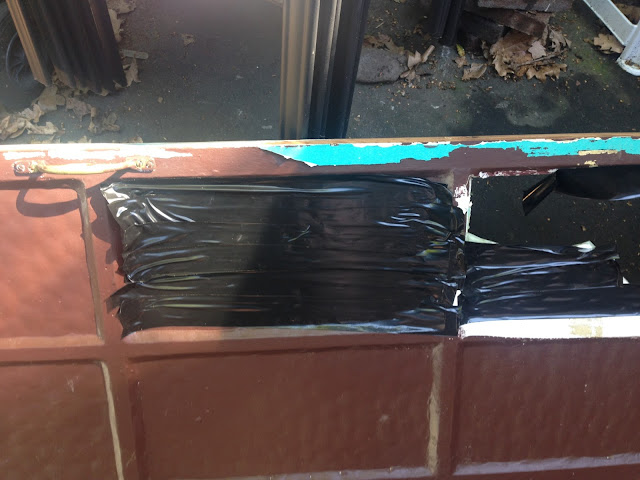
First up - get those glass panes out.  I just stuck gaffer tape over all the glass and then hammered it out.  Still shattered a bit but generally that kept it together enough to be able to get rid of all the glass.


Then the job of stripping that brown paint, followed by sanding.  And sanding.  And sanding.  Old doors are not easy to get smooth!

Once the door frame was reasonably smooth I undercoated it and then painted again with white enamel trim paint.

I don't have a lot of photos of the painting stage as I was a bit impatient and just wanted it finished!

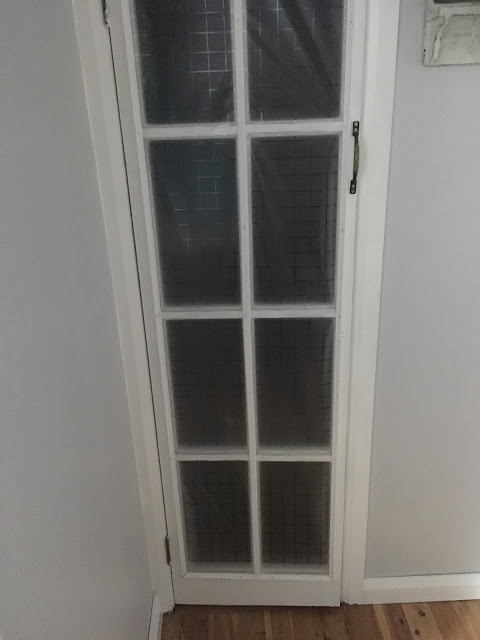
Finally we had worried about what to put back in the door in place of the heavy glass.  I had considered using plyboard and painting it with blackboard paint, to make a kind of built in shopping list/note board, but in the end we found some frosted plastic at Clark's Rubber that looks a bit like glass panels. Just now when I looked up this product I have discovered that it is a static privacy film - you can find it on the Clark Rubber website.


It was fairly narrow - in fact it only just stretched across the opening.  So my dad and I (well, more my dad than I!) had to carefully tack the plastic across.  Then we had bought some thin dowel pieces which I had also painted white so we tacked those on top to hold the plastic.


The hinges and handles went back on and - hey presto - the new/old door has been replaced in the cupboard - which is now a walk in pantry.  


To be honest it was a long process for not that much return, but I can feel like I accomplished something - and also the door itself was an unusual size so at least I knew it would fit back in the door frame!


Friday, 3 February 2017

Herbs - Garden Share Collective January 2017

Where does the time go?  It's already nearly the end of January and so it's the first Garden Share Collective for the year.  I've been missing in action for a while as I have not been doing anything much in my garden but I'm getting back into the swing of things.

The Garden Share Collective is a place where anyone who grows edible plants - from a few pots of herbs on a window sill to acres of vegetables on a farm - can share their progress and take a peek at what other people are growing in different areas of the world.  The link up is hosted by A Fresh Legacy and Rosehips and Rhubarb.

This months theme is Herbs.  So it is something I can actually blog about easily - even when the garden was overgrown (more than it is now!) and nothing much was doing, I always have some herbs that keep growing strongly.

I have a never ending supply of oregano (any suggestions what to do with this?)

Photograph of oregano


My apple mint sprung up again where it had managed to escape its pot and self propagate.

Photograph of a shoot of apple mint

Rosemary is always great for cooking


Do bay leaves count as herbs?  My bay tree looks a little sad, don't think it likes the heat very much.

Basil is always a favourite, although it seems to go to seed quickly.

I think this one is a thai basil

Photograph of basil with purple flowers
Even the basil is going to flower.

I don't have many other herbs in at the moment, it's too hot here in Sydney to have coriander growing, but that will go in in a few beds.

So this month I have done a great job of finally weeding, and am trying to keep on top of that!
Will be looking towards the cooler weather crops and will get the beds ready for those.
Might try again for some snow peas and/or sugar snap peas.

Happy gardening to all! 

Sunday, 22 January 2017

The things you find when you weed....

So not only have I been quite slack on writing blog posts for a few months, I have to admit I have also been guilty of letting my garden get away from me.  I planted a few seedlings about a month ago, and I did attempt to repair some issues with my irrigation system, but it seems that all that happened was that I provided water for the weeds.  

Finally today I decided that it had gone too long.  I could almost do my own ads about "Who is going into the jungle" (can't say that I really watch "I'm a Celebrity", but I do like speculating about just which "celebrities" will be on)  just when someone went out in to our front yard.

So some hard yakka was in order.  I am going to be in serious pain tomorrow.  That couch grass is nasty (and was everywhere!).

I didn't actually take any before photos (it was really too embarrassing) but lets just say that after a few hours I have filled up my 240L green bin and I haven't totally finished. It looks so much better though.  And I found some hidden surprises while I was there.


Turns out the chilli plants I put in have half survived - and I even have one decent size fruit!


Picture of a single raspberry on the cane

Picture of raspberry cane beginning to fruit


My raspberry canes have flourished (even after I pulled some out to give to my niece in an attempt for some propagation - haven't heard how they went yet) and I managed to find some new fruit peeking around and almost ripe.


Picture of tomato plant with others in garden
Still some couch grass there - but in between the raspberry canes that is a single tomato plant.

A runaway tomato plant has self seeded from somewhere or other and looks healthy.

The oregano is going well, and the apple mint and spring onions seem to have also spread and grown well under significant weed cover.

I also saw two lady bugs, which were cute, and three types of spiders - not so cute.  Especially when I thought one might have been a funnel web (thank goodness for leather gardening gloves - and then when I looked up this spider chart on www.pestcontrolsydney.com.au I realised it was probably just a Common Black House Spider.


This spider chart comes from the website www.pestcontrolsydney.com.au


So now I just need to keep the weeds under control - hopefully the thick layer of sugar cane mulch I spread around helps.  And eat those raspberries!