Saturday, 31 January 2015

That really floored me

One of the things I liked about the house when we bought it, and something that is often referred to in real estate speak is "original floorboards" throughout.  We could see that there were floorboards in the spare room, lounge room and dining room, and although it was covered up with a fairly new looking laminate floor we were pretty sure there were floorboards in the kitchen too.  


Quite a good shot to show the old floor in the dining room and where it met the new floor in the kitchen.  The high shine part was laminate type floating floor. 

The old floor boards were not in great condition and had a lot of dirt and paint but they were still sound, no breaks or holes in the boards themselves.
So we decided that it should be fairly straightforward to lift the floating floor ourselves, and we had assumed that we would find the same floor underneath.  The laminate had been laid in a fairly slap dash way, the edges were certainly not what you would call professionally finished.

As you can see some small pieces were added at the end of the floorbards and then just a strip of metal or wood nailed down to "finish" it off

This was as we started to pull it up - a lot of small pieces of wood and the boards themselves were ripped up.  
The first layer was not too hard.  The laminate flooring clicks together and also clicks apart, so with the help of a crow bar (well like a crow bar but flatter and smaller, not sure what the technical term is but I called it our lift bar) and a mallet we were pulling them up easily.  Note I said "first layer".  The kitchen guys had already measured up our kitchen and had mentioned that there was 20mm difference in floor height from one side of the kitchen to the other.  As everything in this place is so crooked we didn't think much of it initially.  Turns out, it could have been any one of the 5 + layers of flooring under there which was uneven!

Not the best focus but this shows the second layer (and our mallet) -  lino tiles.

These are lino tiles, so each square is a piece of lino which was glued down.
So second layer - lino tiles.  And who knows how long ago they were stuck down, but the glue was still pretty sticky!
We started ripping this up, which mostly just involved getting and edge and pulling.  
  
The lino tiles were stuck down onto a type of chipboard.  Note the damage around the stove, probably old water damage.

Another shot of the first layer of chipboard, with some of the lino tiles still stuck.  There was water damage around this wall as well.
The chipboard was hard to get up, it was in larger sheets and was quite heavy.  

Next layer was another layer of lino.
We were starting to feel a bit like we were unwrapping babushka dolls - a floor under a floor under a floor (and repeat).  This layer was another layer of lino, a kind of yellow colour with a pattern on it.  It was full sheets of lino, not in tiles.  It had been stuck down directly onto a third type of lino, I don't think I have any photos of that one as the glue was still quite strong and as we ripped up the yellow lino we took the other one with it.  The final layer was another layer of chipboard.  By this stage we were getting tired and cranky - what had been expected to take us an hour or so maximum was up to 3-4 hours.  And we hadn't found the floorboards yet!  But as the chipboard came up we found - 

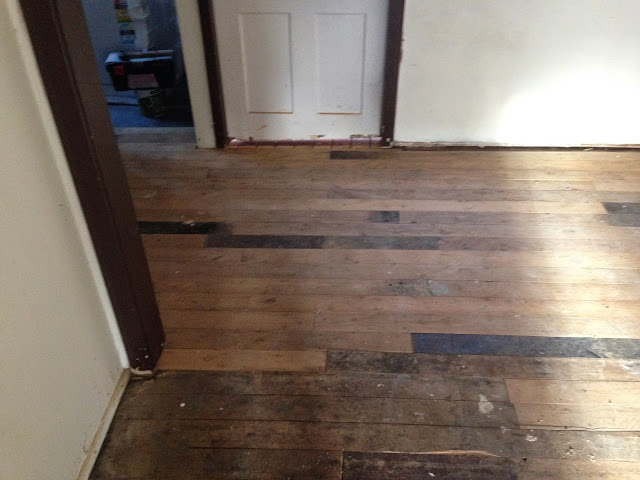
Finally - we found floorboards!  And in surprisingly good condition, especially considering the water damage we had seen.  Maybe all the layers were good protection.

But another snag - there were only floorboards under 3/4 of the floor - the rest was this large piece of board, put down over what was probably previously a verandah.
So we finally found the floorboards - with two fairly major issues.  The biggest one was the lack of floorboards in one whole section of the floor.  Can't exactly polish up a big piece of board and hope no one notices.  We needed to put in a floor and we needed it within five days, as I had already booked the polishing in!  The other issue was the staples in the main floorboards.  Thousands of tiny little staples which all had to be removed by hand, without marking the floor.  

The first issue was solved by the company we had already booked to come and polish the floors.  I rang them in a panic to ask what we could do, and they sent me Julius.  Julius is a very deaf carpenter, who we struggled to communicate with  - but since he could see the problem fairly easily when he arrived we didn't have to explain much.  And he worked magic.  He sent my husband to buy reclaimed floor boards from a local timber place - Rozelle Recycled and Ironwood - they have a number of different timber and stone retailers there, including one that sells reclaimed boards - a great place to look for building materials.  And then Julius was able to come in to do our floor the next day, and built a floor for us from scratch.

Underneath the piece of board was only rubble, no joists or any support at all - no wonder the floor was at different heights in different places.

The joists were built with treated pine.  The rubble we removed by hand - although I didn't touch the mummified rats we found under there, those were shovelled into the rubbish!

And once it was done, you could barely see what was "new" floor and what was old.  The use of reclaimed floor boards (these are cypress pine and about 85-90mm wide) meant it blended in.

In this picture you can see a little more obviously where the floor was built - however later when it was polished you can't tell at all.
I can't speak highly enough of Julius and the fact that he saved our floor - and us!

The staples were another question.  We all took turns at trying to prise them out, and gradually removed most.

Each of those little marks is a staple, many with chipboard still attached.  I guess whoever put it down didn't plan on ever seeing those floorboards again.

I have no idea why they used so many staples.  But they all had to come out to be able to polish the floor
The staples were prised out gently using long nose pliers.  I tried other tools, particularly after requesting suggestions from my friends on Facebook.  I think my cousin gave one of the best pieces of advice when he said 

With each job there is an easy way and a hard way. You can never have enough tools. Take this dilemma down to your local hardware store find the oldest fella with the roughest looking hands and ask him for advice"
Pretty much was what I followed for the whole renovation process! (Thanks Ben)

The next post will cover the polishing of the floors - and how they came up in the end!

Wednesday, 28 January 2015

The Accidental Gardener

I think this little petunia might just about sum up my attempts at gardening so far.  I've been carefully tending plants, watering, weeding and fertilising for a few months.  Then I saw a little tiny plant in amongst my garden and for some reason I decided it looked different to the other weeds, so I would leave it to grow for a while.

Suddenly it looked like this - (not the white flowers, that's the impatiens behind it)


So as I always do when I need to check what a plant is - I sent a picture of it to my dad. And he texted back to tell me it's a petunia.  I don't really understand how I magically grew a petunia.  I did have a small tray of seedlings I was attempting some months ago, most of which had died, and then my mum kicked it over accidentally - so I can only assume one of those tiny plants somehow survived and then flourished, despite digging it up and generally neglecting it.  It's an accidental petunia.  And I'm an accidental gardener.  I didn't expect to enjoy it so much but suddenly I am seriously considering the relative merits of different sorts of potting mix and making sure I'm home every night to water my garden.  I'm still not exactly skilled, but I'm enjoying it.  And starting to recognise plants without having to text my dad.  

Now if only my planned attempts at growing plants from seed could be so successful......


Lovely purple flowers

It seems to be an awfully tall petunia!


Sunday, 25 January 2015

Don't mess with asbestos cause asbestos don't mess...

Asbestos - even just saying it can freak some people out.  And it is true that it can be dangerous and countless families have had to deal with loved ones falling prey to lung disease and cancer.  But it seems when it comes to dealing with asbestos there are two schools of thought - those that say get rid of it, and those (who seem to be in a greater abundance) who say leave it where it is and don't mess with it.


But I decided that we needed to at least know what we were dealing with. Being a century old house (in parts), most was probably constructed before asbestos was used as a building material. But with various (and somewhat dodgy) additions I figured there was a pretty high chance of at least some asbestos being present.  And all my research showed that you really can't tell what is or isn't asbestos just by looking at it.  


So I contacted a company called Airsafe to come out and test for us.  The process itself was very quick and the vendor kindly let them in to drill small holes in the walls even before settlement.  We received a report which spelt out which areas had asbestos and what the options are for dealing with it. 


Quality of these pictures aren't great as I scanned them on my phone app, but asbestos was found in laundry and in the kitchen behind the splashback

Describes the types of asbestos (ours was bonded)

So for non friable asbestos it is possible to leave in place providing it is in good condition.

So as you can see we did have asbestos present, but luckily not in too many areas, and also it was the "preferable" type of asbestos.  So then what?  I was keen to get rid of it, but many people said just leave it, don't get into it, don't open that can of worms.  

However, given the fact we planned to redo the kitchen, which would involve ripping out cupboards etc on the splashback wall, and also wanted to eventually do up the laundry/bathroom we decided that we needed to get rid of the asbestos.

So the next step was finding someone to remove it.  It is surprising how many "cowboys" are out there offering to remove asbestos for lower prices.  Who knows where they would dispose of it or the safety precautions they would take.  A couple of things I learnt about asbestos removal and I think are quite important - 

1) The removal company needs to notify Workcover (depending on area of asbestos to be removed) which means they need some time to organise when they come to do the job for you.  

2) You have to get a clearance report after removal is complete to prove there are no fibres still hanging around.  This part annoyed me at first, I felt like it was another expense involved and a lot of money to pay for someone to do approximately 5 minutes work.  But when I thought about it properly, it makes sense that if you are going to the effort to have the asbestos removed you should really get the all clear that it is done.  Besides, the reputable companies can't let you back into the areas without the clearance - so you have to cough up!  I used Airsafe again - and the removal company liaised with them to organise when to turn up which was very handy.

On the day of the removal, I felt very sorry for the guys that turned up.  Three men, fully suited up in suits like spacemen, and then had to isolate the areas with heavy black plastic.  And it was a warm day.  So basically they were in plastic suits in a sauna.

I was staying well clear of the kitchen.  They also had a large extractor in case of fibres.

Some of the bagged up asbestos as it was removed.


The kitchen wall post removal of asbestos.

Bathroom/Laundry after removal of asbestos.

Bathroom/Laundry - some parts of the wall were not asbestos fibres so they were not removed
So asbestos was gone.  But obviously - new walls were necessary.  I had actually sort of forgotten about that part.  We had a draughty house for a while there!

In terms of costs - the original report and testing cost us $650, the removal itself (one wall in kitchen approx 6m x 3m, four walls in laundry which is a room about 3 x 2.7m) was around $1750 and the clearance report afterwards (which I think I got a discount on due to using them previously) was about $400.  To be fair, a fairly reasonable cost for peace of mind.  Also I would recommend if you are getting outside contractors to do any work (such as kitchen installation or electricians) that you get asbestos removed, because that was one of the first questions they asked and it was very helpful to be able to show them the testing and removal reports.  So overall - I think definitely worth the effort.


Wednesday, 21 January 2015

Humidity's rising, Barometer's getting low....

Humidity's rising, Barometer's getting low, According to all sources, The street's the place to go....

Sydney in summer.

A swim at the beach, a drink in a sunny beer garden, a ferry ride on the harbour... and mouldy zucchinis?


Apparently zucchini plants are about as fond of humidity as I am, and in the same way that I become a cranky perspiring frizz ball my poor plants are looking very much the worse for wear.  
This is one of the less damaged leaves

Most of the plant seems to be affected (or infected?)

I think there might be something more than just the fungus going on here as there seem to be bugs on the underside of the leaves


The problem is powdery mildew - and according to my newfound favourite book "What Garden Pest or Disease is That" by Judy McMaugh (thanks to my brother for that gift!) it's pretty common among cucurbits (that's such a funny name.  Covers marrows, squashes, zucchini, cucumbers and I think watermelons and others as well).  I have found a few ideas on how to treat it and also some places tell me it's not fatal for plants - but I beg to differ. From what I have read it seems I should have been more proactive when the spots first arrived, and removed any affected leaves.  I also should have planted them further apart so that there was more air circulation available.  Some good information can be found here at the Sunday Gardener website.  I think perhaps I will give up on the zucchinis for this year, and try again when it's not so hot and sticky.  It's probably not even the right time to grow them, I'm not too sure about when to plant things so I have a habit of just putting in seeds randomly and seeing what happens. I'm still quite proud the plants got so big from just a little seed.

Monday, 19 January 2015

I want it painted....

First job was painting.  I figured this was something we could actually do ourselves, especially as my brother and dad could be roped in to assist.  And to be fair, given the state of the previous paint job, pretty much anyone could have done a better job.  It seemed they had taken a rather abstract approach to the paint job.  Random colour walls, where they made mistakes they just left the paint there (think red brush marks on a yellow ceiling) and possibly worst of all, they seem to have disliked white light switches, so they just painted over.  Brings to mind the Rolling Stones - "I see a red door and I want it painted black" - just substitute in light switch and brown.  Or red.  Or green.  Or in one case, part green and part brown.  

These are some of the before shots - 

The red wall in the lounge room.  Just painted on the ceiling and left it there.  The roof doesn't give the full idea as it was a kind of yellow orange.

The opposite side of the lounge room - this one kind of 70's faux wood panelling.  Took me a long time to realise all the walls had the same texture "panelling" but were just painted different colours - the two ends are both white here.

So you can just about see the painted over light switch here. Just brushed right over. Turns over that was a type of vinyl paint - which had to be peeled off with the help of paint stripper before we could paint over.  Oh and great dark brown door frames.
 
This one shows a bit better the yellow roof.  And more of the dark brown trimmings.  Including cornices, which was just quad.

This is the dining room.  Not sure what was going on with the random yellow/brown paint.  

The spare bedroom.  Okay this was once I'd started painting the wall, it wasn't striped before.  But it was yellow.

The master bedroom - which is actually still the same.  We never did get to paint there (well, not yet).  I thought the crazy colour scheme was kind of cool at first - bit over it now.  So that is grey ceiling in the main arch, white on one end, pale kind of mint green over the balcony, and dark green on the other end and over the ensuite. 

This is the opposite wall of the main bedroom.  And that (although possibly a bit hard to see) is the three quarter brown/quarter green light switch.  At least it is white now, even if the wall is still green.

And after our extensive paint job - here are some of the after shots


The lounge room - white ceiling, white cornices and all the same colour on the walls.  So much nicer!
Slightly patchy ceiling - but this was after four coats and we were over it.

Check it out - white light switches! (installed by our electrician, not a magical paint job) That isn't patchy paint colour on the wall, it's the reflection of light from our new chandelier.

So I hope you agree that it is much better!  The colour we used was Taubman's Twill - a light grey although it seems much bluer than I expected.  Could be that the outside bright blue exterior paint reflects in.

I'm sure that anyone who has ever decided to paint a room has probably sworn never to do it again.  I got out of it a bit by enlisting my brother to paint the ceilings - which he did (not exactly without complaints but with not too much issue) and also dragging in my mum, dad, niece and my husband as well.  But it is a long job, and the prep work is the worst.  Some of our efforts still need a bit of fixing.  We have painted that main arch white now, but the other doorways are still waiting.  

A couple of suggestions I would make to anyone who wants to paint - especially a whole house - 

1.  Undercoat.  We didn't bother with the first ceiling, and regretted it almost immediately when we needed to put 4 coats of ceiling white on, and it was still patchy.  I thought it was saving money not bothering but I think in the end you just buy more of the other paint.  The other rooms turned out much better with the undercoat.  

2.  Buy good quality roller covers and an extension handle.  I didn't realise until later in the painting job that there are different types of material (with different thickness of nap) for different types of paint (semi gloss, gloss etc) and even differences between the same fabrics.  Again, my earlier purchases were cheaper but you get what you pay for.  That said I don't think you need to buy super expensive ones, but just a bit better quality.

3.  Prep, prep, prep.  It's boring and it's hard but the more you sand and smooth and clean up the walls before you paint the better it looks.  As the time wore on we got a bit more lax with the prep and again, those are the walls I now look at and think we need to redo.

4.  Clean up your brushes and roller covers straight away.  This might sound really obvious and stupid but after a long day painting and then going home to where we were renting the last thing I ever felt like was cleaning up the brushes and equipment.  But even if I "put them in to soak" if there were any bits sticking out that dried, the rollers were ruined.  We ended up throwing out a few brushes and roller covers because the paint dried and just could never come out.  So clean them up unless you have unlimited funds for new equipment (and don't care at all about waste and the environment!)

In terms of costs - painting is at least reasonably inexpensive.   It does still add up though by the time you buy the brushes, roller covers, masking tape, sand paper, paint scraper (also handy for smoothing out the walls) and the paint itself.  To be really honest I don't recall how much paint we went through.  At least 12L ceiling white, 8L undercoat, and 20L plus of the colour.  A 10L tin of Taubman's Endure is around $160 or so.

And just because I really like this song - 


Saturday, 17 January 2015

Reality (TV) Check

I don't generally consider myself gullible.  I don't believe in unicorns or expect to see leprechauns at the end of the rainbow.  And I know that "reality" tv has very little resemblance to actual real life - I mean they're mostly just about the train wreck like quality of not wanting to watch and yet not being able to look away.  But somehow I seem to have been sucked in by the DIY renovation shows, and so my expectations of the difficulties involved were very much lowered.


The Block is probably the worst - the formula seems to be to take two attractive young people, usually a young woman who is more concerned about her nails and hair than drill bits, and her handsome tradie boyfriend - throw them together with 3 other couples and watch them apparently build high class apartments from scratch in a period of six weeks.  Of course that is feasible.  Building approval?  Council restrictions?  Actual professional tradesmen (particularly those that turn up, quote, then turn up again to do the work)? Who needs those? Then someone pays millions for the privilege to buy the apartment, leaving said young couple to be amazed about their sudden wealth and to be able to sail off into the sunset to get married and sell the story to the women's mags (if they can fit it in around The Bachelor (how funny is Rosie?) offcasts, the weight loss wonders of the Biggest Loser or the inside gossip from the kitchen shows....)  At least House Rules involves real houses being renovated, although the possibility for each couple involved to renovate in a totally different style may mean you end up with a federation, rococo, modern, minimalist, shabby chic casual beach house fibro shack.


Every tradesperson we had through the house in the early stages mentioned The Block.  Maybe it was obvious that we had close to no idea about the process.  Maybe they had all been burnt by people who were inspired by Scott Cam before.  But pretty much every conversation started something like -

Tradie - "So you want to renovate.  Big job"
Me "yep"
Tradie - "Do you watch The Block?"
Me "sometimes"
Tradie - "You know behind the camera they have a team of tradies ready to work.  Nothing is like it is on TV.  You can't do it in short time"
Me "oh well, we've got two or three weeks......" (this part generally said silently so I wasn't laughed out of town!)

So I admit, I was ambitious.  But at least I had some validation later, when the same tradies came back to complete jobs - and then the conversations went more like -

Tradie - "It certainly looks different"
Me "Yep"
Tradie - "Looks good.  I didn't think the floors/walls/carpet/tiles/kitchen would come up so well"
Me "Thanks.  We like it"
Tradie (well this was mostly just our plasterer/handyman) "You should go on one of those TV shows..."

Think I'll just stick to watching thanks.